

快速开始
用内存宿主搭一个可运行的聊天界面,再换成真实后端。
快速开始
预发布版本
这些包是
3.0.0的预发布版本。所有@openmaxai/chat*包锁定同一个确切版本号,见安装。
一个 Vite 应用:左边会话列表,右边消息区,数据都在内存里,不需要服务端。
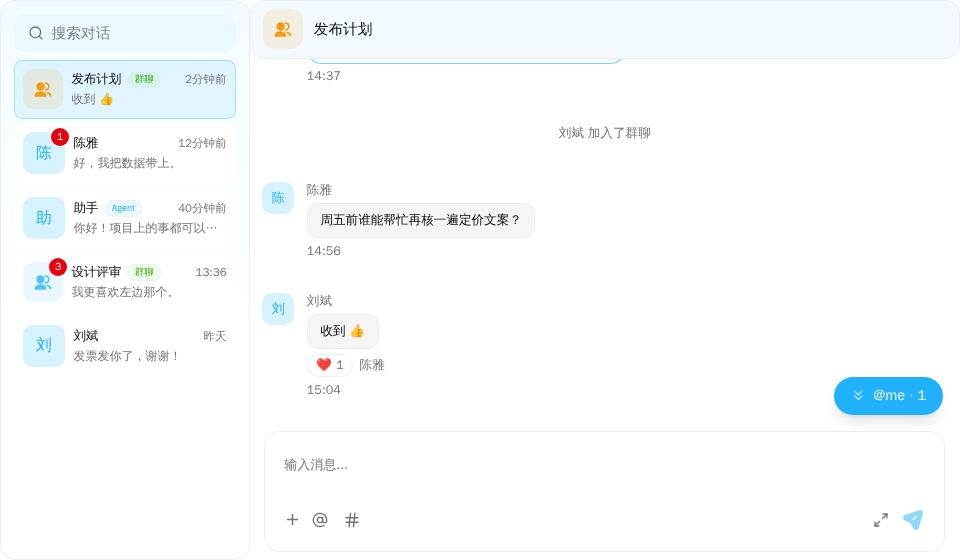
演示截图。演示跑在内存里的示例 host 上(演示工具包里的 useDemoHost,不在发布的包里);你的应用里换成 createChatHost() 创建的 host。
演示源码(用到文档站的演示工具包和 Tailwind CSS 类名,不能直接复制使用): chat-app.tsx
"use client";

import { ConversationList } from "@openmaxai/chat/conversation-list";
import { ChatHeader } from "@openmaxai/chat/header";
import { ChatHostProvider } from "@openmaxai/chat/host";
import { MessageThread } from "@openmaxai/chat/message-thread";
import { useState } from "react";
// Docs helpers: useDemoHost() is an in-memory host with sample data (no backend), and
// useDemoConversations() is its conversation list (a DM started from search is added to it).
// In your app, pass the host from createChatHost() or your own ChatHost instead.
import { useDemoConversations, useDemoHost, useIsCompact } from "./kit";

export default function ChatApp() {
	const host = useDemoHost();
	const conversations = useDemoConversations();
	const isCompact = useIsCompact();
	const [selectedId, setSelectedId] = useState<string | null>(
		isCompact ? null : conversations[0].id,
	);
	const selected = conversations.find((c) => c.id === selectedId) ?? null;

	return (
		<ChatHostProvider host={host}>
			<div className="flex h-full bg-background text-foreground">
				{/* On a phone show one column at a time: the list, or the open conversation. */}
				<aside
					className={
						isCompact ? (selected ? "hidden" : "min-w-0 flex-1") : "shrink-0"
					}
				>
					<ConversationList
						conversations={conversations}
						selectedId={selectedId}
						onSelect={(c) => setSelectedId(c.id)}
						onDeselect={() => setSelectedId(null)}
						// Starting a DM from search opens it here too.
						onSelectConversationId={setSelectedId}
					/>
				</aside>
				{selected && (
					<main className="flex min-w-0 flex-1 flex-col">
						<ChatHeader
							conversation={selected}
							headerTitle={selected.name ?? ""}
							headerSubtitle={null}
							isAgentCollab={false}
							isObserving={false}
							collabAgents={[]}
							typingText={null}
							mode={isCompact ? "compact" : "full"}
							onBack={isCompact ? () => setSelectedId(null) : undefined}
							infoPanelOpen={false}
						/>
						<MessageThread key={selected.id} conversation={selected} />
					</main>
				)}
			</div>
		</ChatHostProvider>
	);
}
创建应用
pnpm create vite my-chat --template react-ts
cd my-chat
pnpm add @openmaxai/chat@3.0.0-beta.5 @openmaxai/chat-store@3.0.0-beta.5 @openmaxai/chat-sdk@3.0.0-beta.5 react-i18next i18next
所有 @openmaxai/chat* 包锁同一个确切版本(这里是 3.0.0-beta.5;之后接 OpenMax 时的 @openmaxai/chat-openmax 也一样),见安装。react / react-dom 19、react-i18next(^17.0.8)、i18next(^26.3.2)是 peer 依赖。这个示例不需要 @tanstack/react-query。
配置样式和 Vite
配置说明见安装。
src/globals.css
@import "@openmaxai/chat-sdk/styles.css";

html,
body,
#root {
  height: 100%;
}
vite.config.ts
import react from "@vitejs/plugin-react";
import { defineConfig } from "vite";

export default defineConfig({
  plugins: [react()],
  resolve: { dedupe: ["react", "react-dom"] },
});
建一个内存宿主
宿主是组件读取数据的对象。createChatHost 用一个适配器建出宿主;这里的适配器是 createMemoryAdapter,它在浏览器里放一个小后端,不需要服务端。
src/chat-host.ts
import { createChatHost } from "@openmaxai/chat-sdk/react";
import { createMemoryAdapter } from "@openmaxai/chat-sdk/testing";

export const adapter = createMemoryAdapter({
  me: { memberId: "me", displayName: "You", kind: "human" },
  people: [
    { memberId: "ada", displayName: "Ada", kind: "human" },
    { memberId: "helper", displayName: "Helper", kind: "agent" },
  ],
  conversations: [
    {
      id: "welcome",
      name: "Welcome",
      messages: [
        { senderId: "helper", text: "Hi! This chat runs entirely in your browser." },
        { senderId: "ada", text: "Send a message to try the composer." },
      ],
    },
    {
      id: "ada",
      type: "DM",
      name: "Ada",
      memberIds: ["ada"],
      messages: [{ senderId: "ada", text: "Hey, how is the SDK going?" }],
    },
  ],
});

export const host = createChatHost({ adapter, locale: "en-US" });
渲染聊天
src/app.tsx
import { createChatI18n } from "@openmaxai/chat-sdk";
import {
  ChatProvider,
  ChatRoot,
  ChatSplitLayout,
  ConversationHeader,
  CwsConversationList,
  CwsMessageThread,
  useChatSdkConversationList,
} from "@openmaxai/chat-sdk/react";
import { useState } from "react";
import { I18nextProvider } from "react-i18next";
import { host } from "./chat-host";

const i18n = createChatI18n({ locale: "en-US" });

export function App() {
  return (
    <I18nextProvider i18n={i18n}>
      <ChatProvider host={host}>
        <ChatRoot style={{ display: "flex", height: "100%" }}>
          <Chat />
        </ChatRoot>
      </ChatProvider>
    </I18nextProvider>
  );
}

function Chat() {
  const { conversations } = useChatSdkConversationList();
  const [selectedId, setSelectedId] = useState<string | null>(null);
  const selected = conversations.find((c) => c.id === selectedId) ?? null;

  return (
    <ChatSplitLayout
      open={selected !== null}
      list={
        <CwsConversationList
          selectedId={selectedId}
          onSelect={(c) => setSelectedId(c.id)}
          onDeselect={() => setSelectedId(null)}
        />
      }
    >
      {selected && (
        <>
          <ConversationHeader
            conversation={selected}
            onBack={() => setSelectedId(null)}
          />
          <CwsMessageThread key={selected.id} conversation={selected} />
        </>
      )}
    </ChatSplitLayout>
  );
}
src/main.tsx
import { StrictMode } from "react";
import { createRoot } from "react-dom/client";
import { App } from "./app";
import "./globals.css";

createRoot(document.getElementById("root")!).render(
  <StrictMode>
    <App />
  </StrictMode>,
);
ChatProvider装上宿主和输入框插件。ChatRoot是聊天区的上下文根:给里面的 SDK 组件提供配色,以及菜单、对话框的弹出层落点。SDK 组件都放在它里面。它本身不是样式作用域:每个 SDK 组件自带组件根,样式表只作用在这些组件根之内。CwsConversationList和CwsMessageThread是 SDK 的会话列表和消息区(带输入框),经ChatProvider读宿主;useChatSdkConversationList给你同一份列表,用来找到打开的会话。ChatSplitLayout把会话列表和打开的会话左右并排;窄屏(视口窄于 768 px)一次只显示一栏:open为 true 时显示会话,否则显示列表。它的宽度由父元素给,所以ChatRoot加了display: flex。见ChatSplitLayout。ConversationHeader是会话上方的标题栏;窄屏上它显示返回箭头,点了调onBack,在那里清掉选中就回到列表。
这个内存宿主没有 workItems,ChatProvider 不装需要它的 # 插件,输入框里只有 @。
运行
pnpm dev
打开 Vite 输出的地址,点开 Welcome 会话发一条消息。想看别人发来的消息,调用 adapter.memory.receive({ conversationId: "welcome", senderId: "ada", text: "Hi" }),比如放在一个按钮或定时器里。
接入真实后端
上面用的 @openmaxai/chat-sdk/react 的 createChatHost 只收适配器({ adapter })。要连 OpenMax,先装 @openmaxai/chat-openmax,版本与其他包相同:
pnpm add @openmaxai/chat-openmax@3.0.0-beta.5
再把 src/chat-host.ts 换成 @openmaxai/chat-openmax/react 的 createChatHost 建的宿主,src/app.tsx 不用改:
src/chat-host.ts
import { createChatHost } from "@openmaxai/chat-openmax/react";

export const host = createChatHost({
  baseUrl: "https://openmax.com",
  wsUrl: "wss://openmax.com/ws",
  auth: { mode: "token", getToken: async () => fetchShortLivedToken() },
  locale: "en-US",
});
baseUrl、wsUrl 就是 OpenMax 的地址(见接入 OpenMax · OpenMax 的地址)。见接入 OpenMax,其中有实时连接的部署方式;其他后端见接入自己的后端。
嵌入 Shadow DOM
要把聊天放进 Shadow DOM、让页面的 CSS 够不着它,把 src/app.tsx 里的 ChatRoot 换成 ChatShadowRoot,并把字符串入口 @openmaxai/chat-sdk/styles 的样式传给它;Chat 不用改:
src/app.tsx
import { createChatI18n } from "@openmaxai/chat-sdk";
import { ChatProvider, ChatShadowRoot } from "@openmaxai/chat-sdk/react";
import * as chatStyles from "@openmaxai/chat-sdk/styles";
import { I18nextProvider } from "react-i18next";
import { host } from "./chat-host";

// `Chat` 及其 import 同上面的 `src/app.tsx`

const i18n = createChatI18n({ locale: "en-US" });

export function App() {
  return (
    <I18nextProvider i18n={i18n}>
      <ChatProvider host={host}>
        <ChatShadowRoot styles={chatStyles} style={{ height: "100%" }}>
          <Chat />
        </ChatShadowRoot>
      </ChatProvider>
    </I18nextProvider>
  );
}
这样 src/globals.css 里对 @openmaxai/chat-sdk/styles.css 的 @import 就不需要了。和 ChatRoot 相比有哪些不同,见安装 · 嵌入 Shadow DOM。
排查问题
| 现象 | 处理 |
|---|---|
| 没有样式 | 检查 src/globals.css 是否引入了 @openmaxai/chat-sdk/styles.css、src/main.tsx 是否引入了 ./globals.css、组件是否是 SDK 的(@openmaxai/chat-sdk/react 的 CwsConversationList、CwsMessageThread)并放在 ChatRoot 里。@openmaxai/chat 的组件(如 @openmaxai/chat/message-thread 的 MessageThread)没有组件根,样式表作用不到,见安装 |
Invalid hook call |
加载了两份 React。在 Vite 配置里加 dedupe |
浮窗打不开,或控制台报 Package version mismatch |
各 @openmaxai/chat* 包装成了不同版本。全部装成同一版本,见安装 |
| 显示翻译 key | 缺 I18nextProvider,或没把 createChatI18n 建的实例交给它 |
实时一直连不上:浏览器里 WebSocket 以 1006 关闭 |
页面的源没有登记。服务端对握手回 403 WS_ORIGIN_NOT_ALLOWED,浏览器读不到,只报 1006。发邮件到 contact@openmax.com 登记页面的源,或在同源代理里改写 Origin,见接入 OpenMax · 实时连接 |
更多见常见问题。